Showing posts with label Tutorials. Show all posts

Saturday, September 16, 2023

How do you like them apples?

September Writing Challenge - Prompt #35:

Snacks

When I chose the prompt “snacks,” this is not what I had in mind. Today I’m going to write about… apples. Yes, apples. Apples make a fine snack. They’re great plain, and they’re even better dipped in cookie butter (Biscoff crunchy is my personal choice). 

You know what makes apples even more awesome? When they’re free! So I’m grateful to my apple-growing friend who shared her spoils with me this week, prompting me to write about… apples.

I thought I’d share with you how I treat apples to slow the browning. I’ve tried a few different ways, and this is the method I think works the best: slice ‘em, soak ‘em in salt water for 10 minutes, and rinse ‘em. 

I just fill up a bowl with enough water to cover the apple slices and put some salt in it. I don’t measure, but as a guide, about 1/4 tsp of salt per cup of water - give or take a bit. I’ve used kosher and table salt, and both have worked well.

Here’s one of my apple slices from yesterday - I packed them in my kids’ lunches, and I treated them with salt water around 7:00 a.m. I bagged some for myself and drove around with them in the van all day. Then I ate them at 2:45 p.m. while was waiting for Daisy to come out of school. 

As you can see, after almost eight hours, the apple had hardly browned. I’ve been doing this for years, and it’s been a great little snack hack.

Chomp!

Here are some apple slices that I treated in the evening and sent in my kids’ lunches the next day. Just a touch browner than the eight hour batch but still pretty darn good!


Monday, August 22, 2022

How I Peel Peaches (and Tomatoes)

I spent most of the day today canning peaches and tomatoes. It's a messy, sticky, and time consuming process, but it's also fun in some sick, twisted kind of way, and it gives me such a sense of accomplishment. "Food prep high," as I've recently come to call it

I did 13 quarts and one pint of peaches, and I have three quarts of roma tomatoes processing as I type this. So far, I know at least one jar of peaches didn't seal, so I'll be adding those to my kids' lunches for tomorrow. I'm still waiting patiently to check the rest of them (I'm always so tempted to mess with them before they've sat for the appropriate amount of time). 

Anyway, since I'm on a food prep high, I thought I'd share a little tutorial with you today about how I peel peaches and tomatoes. 

If you've ever canned peaches or tomatoes, you're probably familiar with blanching. I have my mother-in-law to thank for teaching me The Ways. I remember when she first showed me how to blanch tomatoes to get the skins off - it blew my mind! I had no idea you could do that! Twenty(ish) years later, I still think it's pretty miraculous. 

My mother-in-law passed on some pretty cool tips for blanching in large batches, so that's what I'm going to show you today. She taught me to blanch peaches and tomatoes in the sink. Here's how I do it:

First, I make sure the sink is nice and clean. Then I get a nice big pot of water boiling. 

After washing the produce, I plug my sink and put the fruit in it. I have found that filling my sink the amount shown in this picture is usually enough to get a full batch (7 quarts) in the canner with just a few pieces left over (which I usually freeze - but I like to have a bit extra just in case).

When the water has come to a full boil, I pour it over the fruit and let it sit for a few minutes. I gently stir the fruit with a wooden spoon to make sure it all gets immersed in the water. It's important to make sure the sink is properly plugged and that you have enough water to cover the fruit! They float up a bit, and I just press them back down in the water with the spoon. 

If you've never seen this before, here's what happens - the hot water softens the skins and allows them to easily slip off the fruit. You don't have to use a knife or a peeler! It just slides off (with a few exceptions - like, if you have pieces of fruit that aren't as ripe, in which case, you might have to cut off a bit of skin, but for the most part, it's easy peasy, and they slip off like nothing). 

After the skins start to lift off the fruit (with peaches you can see it happening, but with tomatoes, you might have to test one with your fingers), I wait about one more minute (for the stragglers) and then use my wooden spoon to lift the plug out of place to drain the water (common sense tip: don't stick your hand in the boiling water).

After the water drains, I run cold water over the fruit to stop the cooking process (also known as "shocking" the fruit). 


From that point, the skins slide off easily, and I can continue the prepping process for canning.

I also use this method to prep peaches to freeze and even to prep smaller batches of peaches for my kids to have as a snack. 

Anyway, I really like using the sink rather than blanching in a pot. It allows me to blanch a lot more fruit at a time. Go big, or go home, amiright?

Happy peach and tomato season! However you choose to celebrate!

Thursday, June 25, 2020

An Amateur’s Chalk Art Tutorial

Lately, I've found solace through simple activities like coloring on my sidewalk. It may seem like a silly way to spend my time, but it's keeping me stable, and it's something I can do with my kids that we all enjoy.

Since there is very little in the way of "how to's" on the internet when it comes to sidewalk art (or "street painting" - as the cool kids call it), I thought I'd do a little overview of techniques and supplies. Here's the thing, though: I am super amateur. I know next to nothing about art and art supplies, so I feel like I'm the wrong person to be doing this. But someone should do it, right? So just know that this is what I've discovered in my experiences with chalk art, and it may or may not be quality information.

First let's talk supplies.

Traditional children's sidewalk chalk is always fun, but it's very limited in colors, and it isn't very vivid. 

To expand your color palette, you can use soft pastels (not to be confused with oil pastels. Don't use oil pastels!) Soft pastels can be found in most craft or hobby stores or on Amazon. I recently found some very inexpensive sets at Ross. 


This package of soft pastels was $3.99 at Ross
Fresh pastels give me that "new crayon" feeling from elementary school

I've purchased and tried several brands, and thus far, they’ve all seemed equal in quality. That might not be so if I were doing "real art," but with coloring on the ground, I haven't noticed much of a difference between brands. I've bought packages that come with very small pastels and some with larger sticks. There are pros and cons to both. Either way, they “spend” quickly.

My container of "scrap" chalk of various sizes
This gives me the "old crayon" feeling, but they are still useful

With the smaller pastels, I obviously run out of a single color faster. I've started blending multiple shades to make my colors last longer. For example, if I'm coloring something blue, I’ll usually color the outer edges with a darker shade of blue and then color the inside with a lighter shade of blue (Or vice versa) and then blend the blues together with foam. 

I like to have a good supply of black chalk for outlining. I go through a lot of black chalk, and the multicolored sets usually only have one stick of black. 

A package of black chalk

A package of "grayscale" chalk

I like to use inexpensive white chalkboard chalk or sidewalk chalk for my initial drawing (no reason to use the expensive stuff for this part).

Another supply I like to have is some type of foam for blending. Most packages of pastels come with a foam insert like this:

Foam insert from a package of soft pastels

This is perfect for breaking off a piece and using it to blend the chalk. I also bought this square of white foam to use for blending. I just tear off a piece when I need it. As you can see, we've touched it with our very messy hands, so it's taken on chalk dust color, but it still does the job! I use a fresh piece of foam for each color, otherwise they mix.

Break off pieces of foam to use for blending

Speaking of messy hands, I like to keep a package of baby wipes in my supply bucket so I can wipe the chalk off my fingers when I switch colors. My kids wander off with the wipes sometimes, so in that case, I rinse my fingers with the hose or wipe them on my pants. Just a note: don't dress nice while doing chalk art. In fact, if you can't handle "messy," this probably isn't a great pastime for you. 

The mess is part of the experience

A cheap can of hairspray is handy for setting the color and helping it stay longer. With using hairspray as a fixative, I'm able to drive over my artwork with minimal damage - maybe just a minor tire streak or two. Prior to hairspraying, the drawings smear easily. 

Tempera paint really ups your street art possibilities. When I wrote this post, I hadn't yet tried tempera paint. Within the next week, I purchased some and gave it a go. I really love using the paint for large areas. It's a lot easier than trying to fill it with chalk, and it gets much better coverage. 

For example, Olaf's white base is paint, and then I used the soft pastels to do all of the details. It would have been a pain to color Olaf’s entire figure in white chalk. I used two coats of paint. It dries pretty fast in the heat.

Olaf is mostly made of paint

Mike Wazowski's green base is also paint. I then used chalk to add darker green shading and other details to Mike. 


I originally bought a multi-pack of washable paint to experiment with (the brand was labeled "washable" and did not have the word "tempera" on it - either is fine. The goal is that it is washable/temporary). It worked fine. But then Daisy and I found tempera paint at Dollar Tree, which was pretty exciting! 

Tempera paint from Dollar Tree

Obviously if you use paint, you're going to want to have some paint brushes, too! A small roller is great for covering large areas. I've found that small pieces of rock/cement get embedded in the rollers and won’t come out, but it hasn't been a problem. I've washed and reused my rollers with the tiny rocks in them, and they still work just fine. I'm painting on cement, after all.

Paint brushes


Here's a consolidated list of chalk art supplies:
  • Soft pastels
  • Cheap white chalkboard chalk
  • Black pastels
  • Foam for blending and smudging
  • Baby wipes or a wet rag for wiping fingers clean
  • Hairspray 
  • Tempera paint
  • Paint brushes and rollers
Now let's talk about some techniques. 

I have to have a visual to draw from, so I always search images on my phone for inspiration. I find that "clipart" is usually pretty easy to replicate as it's simplified. 

I start by using my cheap chalkboard chalk (or a piece of "scrap chalk" that is light in color) to draw my picture. This allows for errors. As you can see here, I redraw my lines over and over to get them right.

Sketch of Baby Dory in white chalk

If I end up with too many extra white lines, I use some foam to blend the lines I won’t be using so they cover more easily when I start working with the color.

I usually fill in the "biggest" color first. I don't try get full coverage by coloring with the chalk (this will make the chalk run out very quickly). Instead, I just do a good scribble, and then I use a piece of foam to blend it - which spreads the color and fills it in.

Blue scribbles to start with


Blending the color with a piece of foam

Chalk dust

There will be some chalk dust that lingers. I used to try and blow it away or make it settle more into the cement, but it made things messy and sometimes ruined my pictures. I've found that the better option is to leave the dust alone and spray over it lightly with hairspray. Hold the hairspray kind of high so it doesn't over-saturate the chalk. If the colors lighten or fade from the hairspray, touch them up after the hairspray dries. They spray them again. 


Dory's first spritz


I usually do my base color and give it a spray to set it. Then as I add additional layers of color, I spray again on top of each layer. 

Starting the details of Dory's eyes

A quick note on smudging and blending:

Using my finger to blend the white of Dory's eye

In large areas I use foam to blend the chalk, but there are times when I prefer to use my finger, such as when there are fine lines or small areas. I use a very light touch because I have rubbed off the tip of my fingers before. It's painful and doesn't heal quickly. Make sure to wipe the colors off your fingers before you start using your fingers to blend. If you have magenta fingers, and you start rubbing the whites of an eyeball, you will quickly find yourself with a case of pink eye!

Once I've added all the details and blended the colors where needed, I usually outline my pictures in black. 


The outline helps make the shapes more distinct, and it also helps cover up flaws. I trace my finger lightly over the black outline to help it blend a bit. Then I give everything one last spritz of hairspray!


Now we better talk about the worst part... clean-up. I mentioned this in a recent post, but I'll go over it again just so the information is in one place. 

Everything washes off... eventually. Some colors, like red and black, linger for a long time. One way to speed up the cleaning process is to spray a little water on the painting and let it sit for a minute. Then put some Dawn dish soap on it and scrub it with a brush. Obviously this is more work than anyone wants to do, but if you need the pictures gone faster, this is one way to do it. Even with that effort, some of the color will likely linger. The longer the picture has been there, the harder it is to wash off. Another option is to use a pressure washer, but even with that, there will still be a little bit of lingering color. With time, it will come off.  

I've really enjoyed making chalk art creations - it’s keeping me sane right now. Pretty soon, I'll retire for the season because it will be too hot, but in the meantime, I'm happy to have a hobby that brings me joy. 


Thursday, November 30, 2017

Counter Top Transformation (with tutorial)

As you know, we've been slowly working on updating our kitchen. We still have a lot of work to do, but even unfinished, it's much improved.

Today I thought I'd show you my counter tops. This was one of the first things I did when we started working on the kitchen. I decided to paint the formica. This idea used to horrify me because I know that paint can be touchy and and can damage easily (my philosophy for Pinterest tutorials is, "Question everything!"), but it got to the point where my kitchen was so ugly and out-dated that I just shrugged my shoulders and went, "Eh. It's worth a shot." I had no back-up plan for if the counters didn't turn out. 

It's been about three months since I painted the counters, and I feel that enough time has passed that I can give you a pretty honest review of this process.

Here is what my kitchen looked like before I did the counters (note that these photos were an afterthought, so I took them after I'd already started painting the walls. They are also from my cell phone - because this ain't no home renovation blog).


Here is the formica up close:


Step 1: Sand the Formica

The first thing I did was clean the formica really well and then sand it lightly. I don't remember what grit I used. It was coarse enough to remove some of the shine from the formica but not coarse enough to leave big grooves. I just used what I had on hand. 

I also removed the caulk from around the sink and from where the counter tops meet the wall. This isn't necessary (you might not even have caulk), but our caulk was looking pretty nasty, so I wanted to get rid of it and put some fresh stuff on. This was a tedious process. I used a Goo Gone product for caulk, and I spent hours cutting the caulk with a blade and then scraping off the residue. 

Step 2: Prime

The next step was to cover the formica with a tintable primer. I taped off the sink, but I didn't worry about the walls since we would be caulking and painting anyway. 

I ended up not tinting the primer. I thought I wanted a little white to show through, but in hindsight, I would probably tint it to a slightly off-white or light gray - something that's not so white - because I later ended up coating most of the white with a different color. 

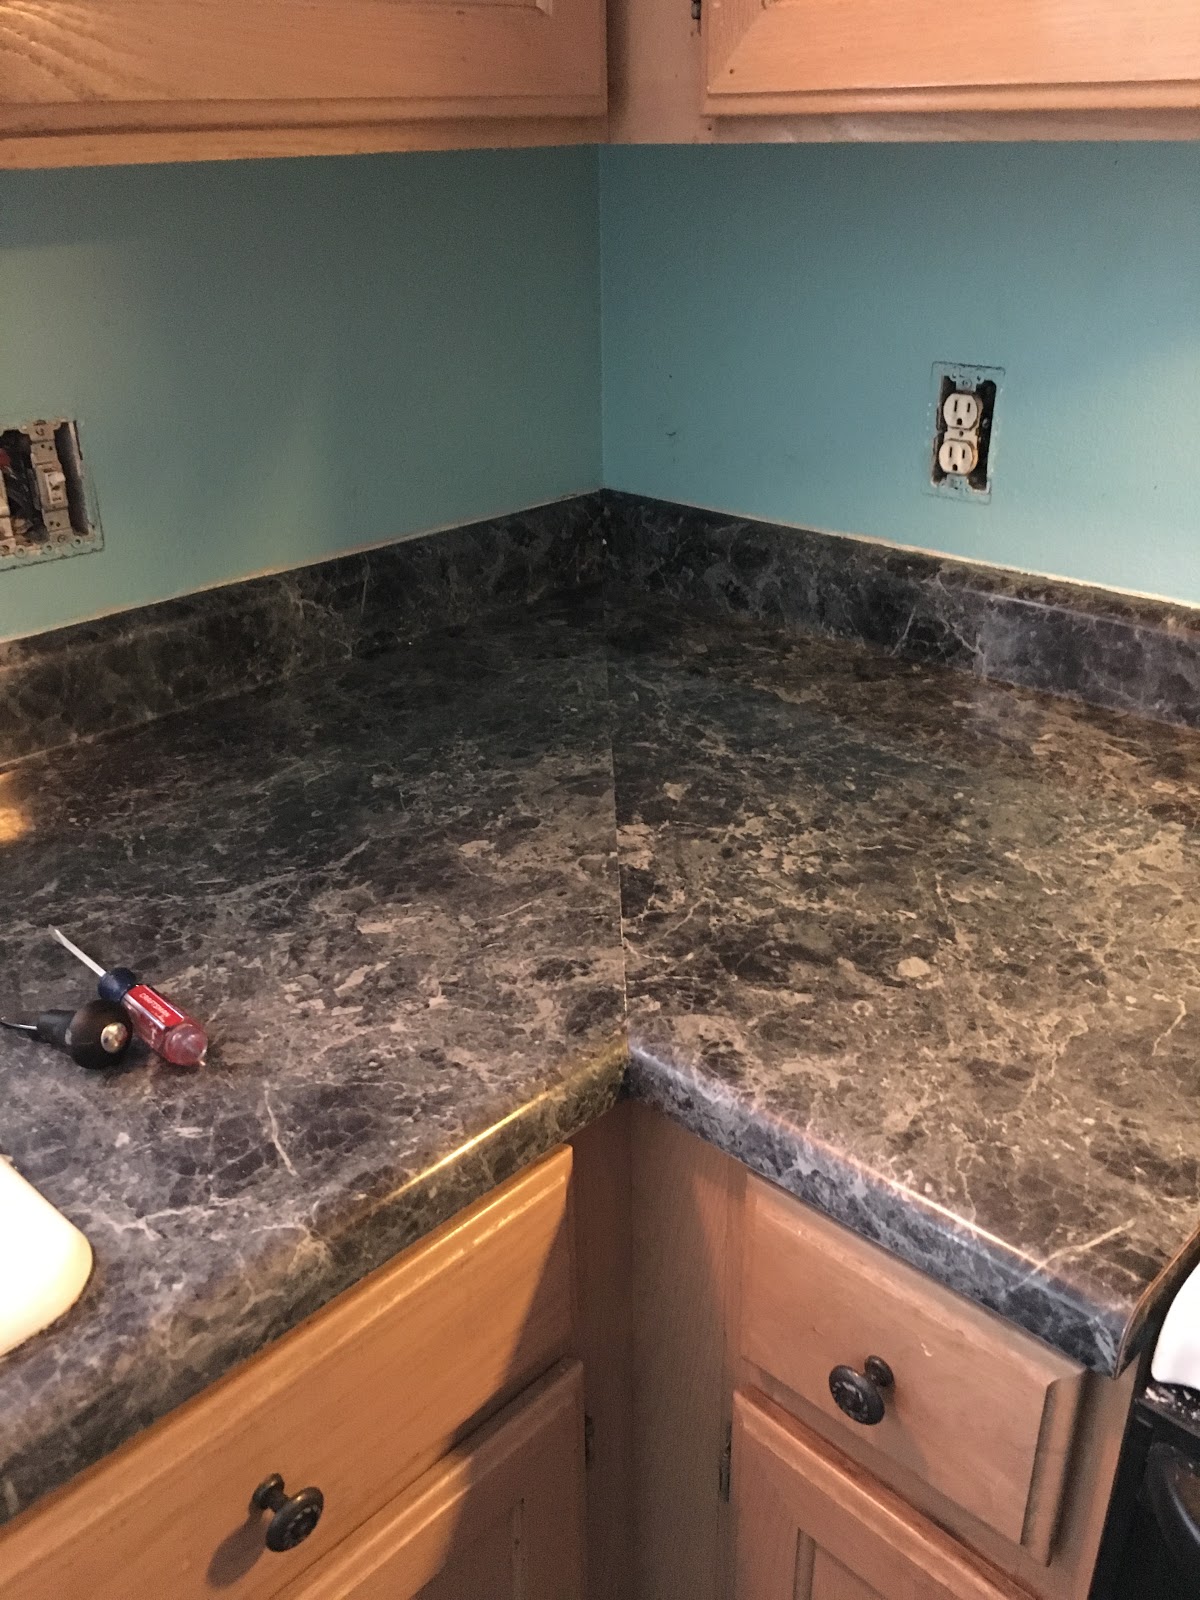
Here is what the tintable primer looked like on the counter:


I used a brush in the corners and small roller everywhere else. I did two coats.

Step 3: Start Adding Color

After the primer dried, I started experimenting with color. This is a process where you have to be flexible. If you have something specific in mind, you might have to mess around with lots of different colors and techniques to get what you want. You may also not get what you want at all, so this project is definitely better for someone who's okay with "playing it by ear." 

I knew that I wanted my counter tops to have some beige, taupe, and gray tones. I bought several bottles of acrylic paint (this is where I wasn't sure if I could trust this task - how can cheap craft paint work on counter tops?) I bought some tan, some gray, and some black, and I knew I could mix colors if necessary. I also bought a natural sponge.

I cut the sponge into four pieces. I experimented with the colors for a while, trying to find a shade that I could sponge onto the white to make it not so bright. I tried the tan and didn't like it. Then I tried a few different grays and didn't like any of them, either. Then I decided that I trust the color I'd chosen for my walls, so I might as well use that, so I sponged on a layer of the latex wall paint so the white only showed through slightly. 


Then I sponged on some gray. 


At this point, I thought it looked "good enough," and I considered just leaving it, but I wanted to see how it would look with a little bit of black. 

When working with the colors, I found that it took a few tries to get the right color, and it also took a few tries to figure out how to work the sponge. I kept a wet towel nearby so I could sponge on some paint and then wipe it off if I didn't like it. It helped to lightly dip the sponge in the paint and then tap it several times on a paper plate until the paint thinned out slightly and absorbed into the sponge. I also needed to be careful to turn the sponge as I went so I didn't get repeated sponge patterns. I also didn't want it to look "too sponged."

I felt like the black was too stark, so I mixed a little bit of gray in it just to lighten it slightly. Once I got the right shade, I sponged it on very lightly so there is just a little bit of black in the counters.


Step 5: Top Coat

I let the acrylic dry for about two hours, and then I started the top coat. I used polycrylic in a satin sheen. I applied it with a brush and did three coats with about two hours drying time in between. 

When the final coat was drying, Scotty was working on moving the cabinet over the stove, and one of the adjacent cabinets fell off the wall and hit the counter on the way down. I was surprised that, even with slightly tacky paint on the counter, the cabinet did minimal damage. This is when I started to believe that painting counter tops might actually be okay.

Step 6: Lightly Sand

After the final coat dried for a day, I took some fine grit sand paper and went over it lightly to remove and bubbles or bumps. The instructions for the polycrylic says that you should sand in between each coat for best results, but I only sanded at the end.

Here is what the final paint job looks like up close:


And here's a shot of the kitchen after I'd finished painting the counters:


Overall, I'm very surprised and happy with the results. I use cleaners on the counter, I scrub them, and I even use crock pots on them. They're doing just fine! 

If this is something you are considering doing, here is what you should know:

This is a great way to update your counters on a budget. I think I spent about $50. Most of the expense was the primer and the top coat. I have quite a bit leftover, so I will be able to use it for my bathroom someday. My formica is over twenty years old, so it's lived a good life. I figured I had nothing to lose.  In my opinion, this is a great option if you want to update your kitchen but can't afford to have new material installed - which is the case with us. I really don't care what my counters are made of as long as they hold up well, but I do care about the color. I'm hoping to get at least ten years out of them. Now that I've been through the process, I know I can easily paint them again if I ever want to.

Even though I really like how they turned out, they do look painted if you look at them up close. You can see some light brush strokes from the top coat. It's not horrible, by any means, but for some people, this will be an issue. Sanding in between coats will help with this, but I didn't sand in between coats. I just sanded at the end.

You can't really guess what the paint will look like until you're elbow deep in the process. It's a project of trial and error. Other tutorials say, "You can't really go wrong..." but you can. The good thing is that it's easy to fix if you don't like how it's turning out. Flexibility is a must!

The counter tops will still have the same problems that formica has. If your kid runs a knife across it, it will leave a mark. If your kids spills water colors on it, it can stain. Both of these have happened at our house, but the paint isn't to blame.

In hindsight, the only things I might do differently are:
  • Possibly tint my primer to a shade of off-white
  • Use some acrylics that have some sparkle. The black paint I got had a little sparkle to it, but when I toned it down by adding some gray, it really dulled the sparkle. In granite and quartz counter tops, you can see a little bit of sparkle. 

I will be sure to update this post if anything ever changes with my counters, but as of right now, I am very happy with them, especially now that my cabinets are painted (I'll post about my cabinets at a later time). I'll also come back and add a picture of the counters with the finished kitchen when it's ready.