I’ve been painting furniture for almost 20 years now. I was just thinking this week about how when I painted my first table, there wasn’t very good information on the internet about how to do it. People didn’t paint furniture back then! I had to go to the paint store and ask lots of questions, and to be honest, they didn’t know anything. There also weren’t very many products for such a task. Just primer, latex paint, and polyurethane, really. Now there’s almost too much information and too many products out there!
Despite the image that DIY bloggers create, painted furniture doesn’t hold up for long. Don’t let them fool you! I always advise people that it’s a temporary fix, and it will eventually need to be done again or replaced, so you should always take that into consideration when you paint something. No matter how careful I am with my work, what kind of product or top coat I use, my painted furniture always gets dinged and scratched over time (unless it's something that no one ever touches or uses).
My kitchen table is no exception! It acquired all sorts of scratches and damage from my kids’ art projects. But that’s the great thing about having an old table. It can take a hit, and then I can do something experimental and imperfect to refresh it for the next round of battering.
Over fall break, my table suffered its final incident before needing to be redone. I made a Halloween dinner for my kids one night, and I had a fun table cloth they could draw on.
I had Nicky put the table cloth on the table for me, and I assumed that it was plastic coated on the back side. My mistake! It was basically paper! My kids used Sharpie on it and left my table looking like this:I tried to magic erase it, but it was stuck for good. I questioned how long I could survive with black widows and tic tac toes on my table, and I decided… not long. I was okay with nail polish spatters and glitter glue, but the Halloween artistry was my turning point.
I ordered the liquid wood and some new paintbrushes, and then I got to work. First I sanded the table to smooth out some scratches. I was very lazy and sloppy about it and was only willing to endure fifteen minutes of sanding (I even set a timer). The result of my laziness is that my table still has tons of visible scratches and indentations in it, but ya know what? I have four kids. Give it a week, and they’ll be there anyway. Why should I endure torturous sanding for a few shorts days of smoothness?
(I hate sanding! It’s the worst!)
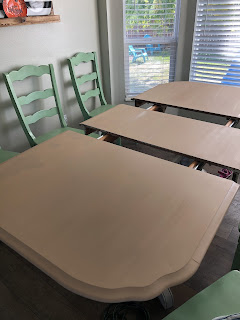
After I sanded the table, I did two coats of liquid wood. I like to call this the peanut butter phase:
Table coated in liquid wood
After the first coat
I also did two coats of polyurethane on top just for extra endurance.
Last time I refinished my table, I let it cure for two weeks before we started using it, but in the end, I don’t think it made it any more durable. So this time, I gave it a good 24 hours of drying time, then threw it to the wolves! My kids ate chicken noodle soup for breakfast on it this morning.
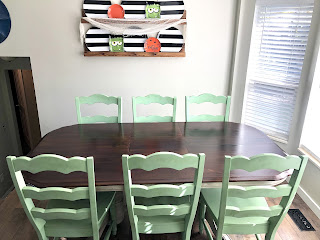
Here's how it turned out:
It's hard to get a decent photo with the bay window lighting, but you get the idea. I definitely liked the lighter color better, but this is good enough to get us through the next few years. My chairs could use refreshing, too, but I still really like the color (Krylon Pistachio with a satin finish), and I can't find it anywhere. I don't know if they make it anymore. So if I do touch up my chairs, I'll probably have to do a full color change, and I'm not to the point where I'm willing to do that level of work.
Now we'll see how it holds up. Three to five years is all I ask! Three is enough to justify the work,* and five is an extra treat! At some point during that time frame, hopefully our house will be paid off, and by the time our table needs another refresh, maybe we can actually buy one! In the meantime, I'm grateful for this hardy beast!
Update 10/23/22: The day after I posted this, a small piece of Polyshades flaked off the edge of the table, so the damage has already begun. I'm trying to keep it contained, but I don't know how it's going to hold up. I'm rather disappointed, but we'll see what happens in the coming weeks.
Update 3/2/25: The paintable stain and Polyshades combo did not hold up well. We left the table like this for three years, but it had several scratches and dings in the paint.
*Actually, with as easy and quick as this renovation was, one year is enough to justify the work, but I don't want to do it again in a year, so I'm aiming for three at minimum


No comments:
Post a Comment